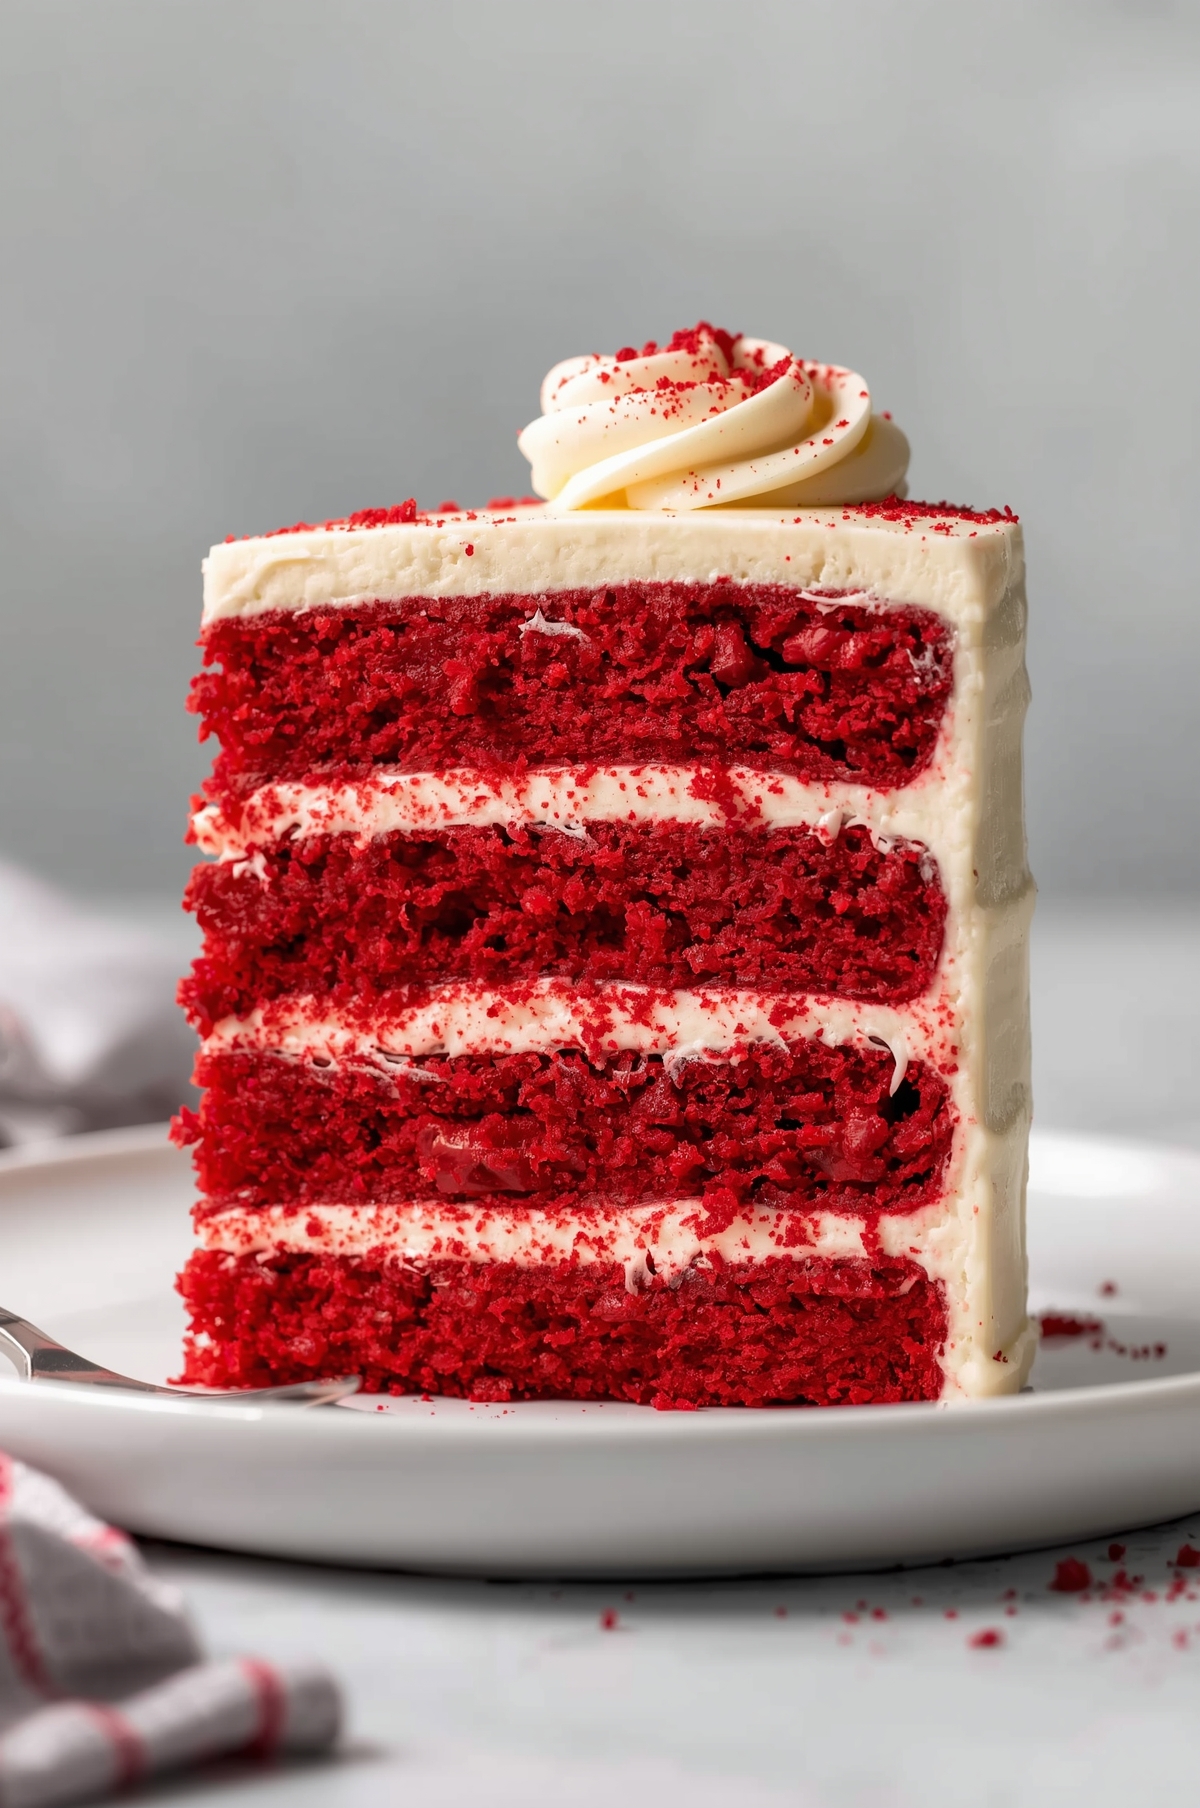
When it comes to show-stopping desserts, nothing beats the charm of a rich red velvet cake with silky cream cheese frosting. Over the years, I’ve baked countless cakes, but this one always gets the most compliments. Its velvety texture, vibrant color, and tangy-sweet flavor make it a timeless classic.
What I love most about this cake is its balance. The cocoa adds a subtle depth, the buttermilk keeps it moist, and the frosting ties everything together with a creamy tang. Whether you’re baking it for a birthday, a holiday gathering, or just because you’re craving something indulgent, this recipe always delivers.
If you’ve ever struggled with red velvet cakes turning out dry, lacking flavor, or not pairing well with frosting, then you’ll appreciate the techniques I’ll share here. I’ll walk you through not just the recipe itself but also the little details that ensure a bakery-quality result every time.
By the time you’re done reading, you’ll understand exactly why this is considered the best red velvet cake with cream cheese frosting and how you can easily recreate it in your own kitchen.
Why This is the Best Red Velvet Cake Recipe
There are hundreds of red velvet cake recipes floating around, but not all of them live up to the hype. I’ve refined this one through experience, testing, and lots of baking feedback from family, friends, and clients. What makes this cake stand out is not just one factor but a combination of details that work beautifully together.
First, the texture. A proper red velvet cake should be soft and tender without being overly crumbly. My method ensures the right balance of wet and dry ingredients, producing a cake that feels light yet indulgent with every bite.
Second, the flavor. Some red velvet cakes lean too heavily on cocoa, while others barely have a chocolate note at all. This recipe finds the sweet spot—enough cocoa to give it depth but not so much that it loses its signature tang. The buttermilk and vinegar play an essential role here, enhancing both the flavor and texture.
And of course, the color. A true red velvet cake should have that deep, striking red hue without tasting artificial. Using the right amount of coloring and combining it with the cocoa results in that iconic shade people instantly recognize.
But what really ties it all together is the cream cheese frosting. I firmly believe red velvet cake is incomplete without it. The frosting adds creaminess and just the right level of sweetness, balancing the cake’s subtle chocolate flavor and tanginess.
Ingredients You’ll Need
Before baking, it’s always smart to gather your ingredients. One thing I’ve learned is that preparation makes all the difference in baking success. Having everything ready ensures a smooth process and prevents mistakes. For this red velvet cake, you’ll need both pantry staples and a few key ingredients that give it its signature flavor.
Here’s what you’ll need for the cake:
-
All-purpose flour – This provides the structure for the cake.
-
Unsweetened cocoa powder – A small amount adds flavor without overwhelming the cake.
-
Baking soda – Helps the cake rise perfectly.
-
Salt – Enhances flavor and balances sweetness.
-
Sugar – For sweetness and structure.
-
Vegetable oil – Keeps the cake moist and tender.
-
Eggs – Essential for structure and richness.
-
Buttermilk – Provides tang and ensures a moist crumb.
-
Vinegar – Reacts with baking soda for lightness.
-
Red food coloring – For that signature red velvet look.
-
Vanilla extract – Always a must for flavor depth.
For the cream cheese frosting, you’ll need:
-
Cream cheese – Full-fat works best for a smooth, creamy texture.
-
Unsalted butter – Brings richness and stability to the frosting.
-
Powdered sugar – Sweetens and thickens the frosting.
-
Vanilla extract – Adds warmth and flavor.
One of the most common mistakes I see is people using substitutes for buttermilk or skimping on the vinegar. Both of these are crucial for that classic red velvet taste and texture. While there are ways to make homemade buttermilk in a pinch, I recommend using real buttermilk if possible—it makes a noticeable difference.
Step-by-Step Instructions
When I bake, I like to think of it as a process where each step contributes to the final result. Skipping one detail can change everything, so I’ll guide you through this recipe carefully.
Start by preheating your oven and preparing your cake pans. I usually line the bottoms with parchment paper and lightly grease the sides. This small step ensures the cake layers release easily without tearing.
In one bowl, whisk together the dry ingredients: flour, cocoa powder, baking soda, and salt. I always sift them first to avoid clumps and to create a lighter batter. In another bowl, mix the sugar and oil until smooth, then add the eggs one at a time, followed by the vanilla extract.
Next comes the buttermilk mixture. Stir the buttermilk with vinegar and food coloring until well combined. This step is where the batter starts to take on that beautiful red hue. Alternating, add the dry ingredients and the buttermilk mixture into the wet ingredients, beginning and ending with the dry. Mixing just until combined is important—overmixing can lead to a tough cake.
Once the batter is ready, divide it evenly into your prepared pans and bake until a toothpick inserted in the center comes out clean. The aroma of red velvet cake baking is always irresistible—sweet, slightly chocolatey, and comforting.
When the cakes come out of the oven, let them cool in the pans for a few minutes before transferring to a wire rack. Cooling completely is crucial before frosting; otherwise, the frosting will melt and slide right off.
Tips for Success
Baking a perfect red velvet cake is not difficult, but it does require attention to detail. Over the years, I’ve learned that small adjustments can make a huge difference in the final outcome.
One of the first tips I always emphasize is accuracy in measuring ingredients. Baking is a science, and too much or too little of something can throw off the entire cake. I prefer weighing my ingredients, especially the flour, because it ensures consistency every single time.
Another important detail is room temperature ingredients. Your eggs, buttermilk, and cream cheese should not be cold when you use them. Room temperature ingredients blend more smoothly, resulting in a batter and frosting that’s perfectly uniform.
Don’t rush the mixing process either. While it’s important not to overmix, you also don’t want lumps of flour or cocoa left in the batter. I mix just until I see the ingredients come together smoothly, and then I stop. This keeps the cake tender and avoids toughness.
Finally, always let the cake layers cool completely before frosting. I’ve seen so many cakes ruined because the frosting melted into a warm cake. Patience here pays off, giving you sharp, clean layers and a professional finish.
Making the Perfect Cream Cheese Frosting
In my opinion, the cream cheese frosting is what transforms this cake from good to unforgettable. I’ve tested countless versions over the years, and I’ve found that the key lies in both technique and ingredient balance.
The most important step is starting with softened cream cheese and butter. If either one is too cold, the frosting will have lumps, and no amount of mixing will smooth it out. I always let them sit out at room temperature for about 30 minutes before starting.
I beat the cream cheese and butter together until light and fluffy, then gradually add powdered sugar to avoid a cloud of sweetness exploding out of the bowl. The final touch is a splash of vanilla extract, which rounds out the flavor beautifully.
Consistency is also something I pay close attention to. If you prefer a thicker frosting, add a bit more powdered sugar. For a lighter, more spreadable frosting, reduce the sugar slightly. The balance between sweet and tangy is what makes this frosting so addictive.
When spreading the frosting onto the cake, I start with a thin “crumb coat” to lock in any loose crumbs. After chilling the cake briefly, I add a thicker final layer of frosting for that smooth, elegant finish.
How to Store and Serve
Red velvet cake tastes best when it’s stored and served correctly. Because of the cream cheese frosting, this cake should be refrigerated, but I always recommend letting it sit at room temperature for about 30 minutes before serving. That way, the frosting softens slightly, and the cake tastes moist and tender.
If you’re making it ahead of time, you can store the frosted cake in an airtight container in the refrigerator for up to four days. Individual slices can also be wrapped in plastic wrap and stored in the freezer for longer. Just make sure to thaw them in the refrigerator overnight before enjoying.
As for serving, I like to cut generous slices because this cake is a true celebration dessert. It pairs beautifully with a cup of coffee or even a glass of milk. The flavors are rich enough to stand alone, but you can also garnish with fresh berries or a sprinkle of cocoa powder for an elegant touch.
Variations and Substitutions
While the traditional version of red velvet cake will always be my favorite, there are plenty of ways to put your own twist on this recipe. Over time, I’ve experimented with a few variations that work beautifully.
For a different presentation, try making cupcakes instead of a full cake. The batter works perfectly for smaller portions, and you can pipe the cream cheese frosting on top for a bakery-style finish.
If you prefer less food coloring, you can reduce the amount or even use natural alternatives like beet juice. The color may be less vibrant, but the flavor will still shine.
You can also switch up the frosting. While I strongly believe cream cheese frosting is the best pairing, some bakers enjoy using a whipped cream frosting or even a white chocolate buttercream for a sweeter twist.
For dietary adjustments, gluten-free flour blends often work well in this recipe, and dairy-free cream cheese and butter substitutes can still create a rich, creamy frosting.
Frequently Asked Questions (FAQs)
Why is vinegar used in red velvet cake?
Vinegar reacts with baking soda and cocoa, giving the cake a light, fluffy texture while enhancing its tangy flavor.
Can I make this cake without food coloring?
Yes, you can. The cake will have more of a light brown shade, but the flavor remains just as delicious.
What’s the secret to keeping red velvet cake moist?
Using buttermilk, oil, and not overbaking are the key factors. Pull the cake out as soon as a toothpick comes out clean.
Can I freeze red velvet cake with cream cheese frosting?
Absolutely. Just wrap slices tightly and freeze for up to three months. Thaw in the fridge overnight before serving.
Is red velvet cake just chocolate cake with red food coloring?
Not at all. While it contains cocoa, the combination of buttermilk, vinegar, and the tangy frosting make it a unique cake with a distinct flavor.
Final Thoughts
Baking the best red velvet cake with cream cheese frosting is all about balance—balancing flavor, texture, and technique. Over time, I’ve learned that patience and precision make all the difference. From the tender crumb of the cake to the tangy sweetness of the frosting, every bite should feel like a little celebration.
Whether you’re making this for a special occasion or simply to treat yourself, this recipe is one that never disappoints. Once you’ve tried it, you’ll see why it has become such a timeless favorite in kitchens everywhere.
So, gather your ingredients, trust the process, and enjoy the satisfaction of creating a cake that not only looks beautiful but tastes truly unforgettable.