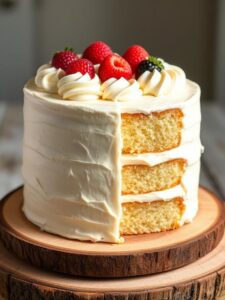
There’s something timeless about a classic vanilla cake made entirely from scratch. For me, it’s more than just a dessert — it’s the aroma that fills the kitchen, the warm, buttery crumb that melts in the mouth, and the satisfaction of knowing every ingredient has been chosen with care.
While store-bought cakes can be tempting for convenience, nothing compares to the rich flavor and tender texture of a homemade vanilla cake. The moment I cut into a freshly baked one, I’m reminded why this recipe is a staple in every baker’s repertoire. It’s versatile, elegant, and effortlessly turns any occasion into something special.
When I bake a vanilla cake from scratch, I’m in complete control of the ingredients. I can adjust the sweetness, choose high-quality vanilla extract, and avoid unnecessary additives. This is not just about baking a cake — it’s about creating an experience, one that’s deeply personal and incredibly rewarding.
In this guide, I’ll walk you through everything I’ve learned over the years about making the perfect vanilla cake. From understanding why baking from scratch matters to exploring the fascinating history of this beloved dessert, you’ll have everything you need to create a cake that’s moist, flavorful, and unforgettable.
Why Make Vanilla Cake from Scratch?
Baking from scratch might seem intimidating at first, but once you take that first bite of a cake you made entirely on your own, you’ll understand why it’s worth the effort. I’ve baked countless cakes over the years, and I can say with confidence that scratch-baked cakes always win in flavor, texture, and freshness.
When I start with basic ingredients like flour, sugar, butter, and eggs, I’m able to control every detail of the cake. I can choose the best-quality butter for a richer taste, select organic eggs for a more vibrant color, and pick my favorite pure vanilla extract for a deeper aroma. No premixes can replicate that.
Another reason I bake from scratch is versatility. Once you know the foundational recipe, you can create endless variations — adding citrus zest for brightness, swirling in chocolate for richness, or layering with fruit for a summery twist.
There’s also a sentimental value to baking from scratch. It’s the process of creaming the butter until it’s light and fluffy, watching the batter transform in the oven, and smelling the sweet vanilla as it bakes. For me, it’s not just about the cake; it’s about the joy of creation, the pride in craftsmanship, and the memories it builds.
History of Vanilla Cake
Vanilla cake has a history as rich as its flavor. While vanilla itself originated in Mexico, where the Totonac people first cultivated it, it wasn’t until the 17th century that it spread to Europe and became a treasured ingredient in baking. At the time, vanilla was rare and expensive, making it a luxury reserved for the wealthy.
When I think about the history of vanilla cake, I’m reminded of how baking trends evolved alongside trade routes. As sugar became more accessible and ovens more common in households, cakes transitioned from simple breads to sweet, celebratory desserts. The addition of vanilla was a game-changer — its delicate aroma and flavor elevated even the simplest recipes.
By the late 19th and early 20th centuries, vanilla cake became a standard in American kitchens, thanks in part to the availability of vanilla extract. This innovation allowed home bakers to enjoy the flavor without relying on whole vanilla beans, which were still costly.
Today, vanilla cake is celebrated worldwide, not just as a base for elaborate designs but also as a stand-alone dessert. Its enduring popularity is proof that sometimes, simplicity is the most satisfying choice.
Ingredients Breakdown & Their Roles
One of the secrets to baking the perfect vanilla cake from scratch lies in truly understanding each ingredient and the role it plays. Over the years, I’ve learned that even the smallest adjustments can make a noticeable difference in texture and flavor.
Flour is the foundation of the cake, providing structure. I prefer using cake flour instead of all-purpose flour when I want a softer, finer crumb. Cake flour has less protein, which results in a more tender texture. If you can’t find it, you can make your own substitute by replacing a small portion of flour with cornstarch.
Sugar does more than sweeten the cake — it also tenderizes it by slowing down gluten formation and helps with browning during baking. The type of sugar matters; I find that fine granulated sugar blends more smoothly into the batter.
Butter adds richness and moisture. I always use unsalted butter so I can control the salt content myself. The creaming process, where butter is beaten with sugar, is essential for incorporating air into the batter, giving the cake a light texture.
Eggs contribute structure and stability, as well as richness. They also help bind the ingredients together. I like using room-temperature eggs because they incorporate more evenly into the batter.
Vanilla extract is, of course, the star. I strongly recommend using pure vanilla extract instead of artificial vanilla flavoring. If I’m feeling indulgent, I’ll scrape seeds from a vanilla bean for an even more intense flavor.
Lastly, baking powder or baking soda acts as the leavening agent, helping the cake rise beautifully. A pinch of salt enhances the overall flavor, balancing the sweetness and bringing out the vanilla notes.
Choosing the Right Vanilla for the Best Flavor
When making a vanilla cake from scratch, the quality of your vanilla can make or break the final result. Over the years, I’ve experimented with different types, and I can tell you that not all vanilla is created equal.
Pure vanilla extract is my go-to choice for most baking projects. It’s made by soaking vanilla beans in alcohol, which draws out their natural flavor. Look for one with no added sugar or artificial coloring. The aroma should be deep and inviting, not overly sweet or artificial.
Vanilla bean paste is another option I love. It’s thicker and contains tiny vanilla seeds that not only add visual appeal but also pack a more concentrated flavor. This is my choice when I want to elevate a cake for a special occasion.
If I really want to go all out, I’ll use whole vanilla beans. Splitting the bean and scraping out the seeds gives the cake a luxurious flavor profile you just can’t get from anything else. It’s more expensive, but for birthdays or weddings, it’s worth every penny.
Artificial vanilla flavoring, or imitation vanilla, is best avoided if you want a truly rich flavor. While it’s cheaper and more accessible, it lacks the complexity of real vanilla. In my experience, using high-quality vanilla transforms a good cake into an unforgettable one.
Equipment You’ll Need
Having the right tools makes baking smoother and ensures consistent results. I’ve learned that while you don’t need an entire bakery’s worth of gadgets, certain essentials are non-negotiable for a perfect vanilla cake.
A good set of mixing bowls is at the top of my list. I use at least three — one for dry ingredients, one for wet, and one for creaming butter and sugar. This keeps the process organized and prevents overmixing.
An electric mixer, either hand-held or stand mixer, is invaluable for creaming butter properly. While you can mix by hand, it’s hard to achieve the same level of lightness and aeration without some mechanical help.
Measuring cups and spoons are essential for accuracy. Baking is a science, and even small deviations in measurement can change the cake’s texture. For the most precise results, I also keep a digital kitchen scale handy.
A fine-mesh sieve is useful for sifting dry ingredients. This step helps prevent lumps and makes the batter smoother. I’ve noticed that sifting also contributes to a lighter crumb in the finished cake.
And of course, you’ll need cake pans. For a classic vanilla cake, I usually use two 8-inch round pans. It’s important to line them with parchment paper and grease them well to prevent sticking.
Lastly, a wire cooling rack is a must. Letting your cake cool properly prevents it from becoming soggy and helps maintain its structure.
Step-by-Step Instructions
When I bake a vanilla cake from scratch, I like to follow a clear process to ensure everything turns out just right. Here’s the method I’ve perfected over the years.
First, I preheat the oven. This is crucial — putting cake batter into an oven that’s still heating can lead to uneven baking and a dense texture.
Next, I prepare my cake pans by greasing them with butter and lining the bottoms with parchment paper. This little step makes removing the cakes so much easier later.
Then I sift together the dry ingredients — cake flour, baking powder, and salt — into a large bowl. This ensures they’re evenly distributed and removes any lumps.
In another bowl, I cream the butter and sugar until the mixture is pale and fluffy. This usually takes about three to five minutes with a stand mixer on medium speed. The creaming process is where air gets incorporated into the batter, helping the cake rise.
I add the eggs one at a time, mixing well after each addition. Then comes the star ingredient — the vanilla extract or paste. I mix it in until the batter smells heavenly.
To combine the dry and wet ingredients, I alternate adding the flour mixture and milk to the butter mixture, starting and ending with the flour. I do this gently, mixing just until combined to avoid overdeveloping the gluten.
Finally, I divide the batter evenly between the prepared pans, smooth the tops, and bake until a toothpick inserted in the center comes out clean. The aroma of vanilla at this stage is always irresistible.