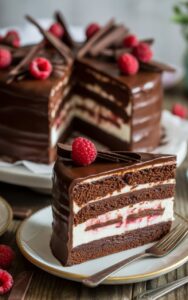
There are cakes, and then there are masterpieces that deserve to be remembered. A decadent chocolate cake with cream cheese filling falls firmly into that second category. This is the kind of dessert that not only pleases the palate but also makes a statement on the table. As a baker who has worked with countless recipes over the years, I can confidently say that this particular cake represents the perfect balance between rich indulgence and creamy elegance.
When people think of chocolate cake, they usually imagine something dense, moist, and irresistibly chocolatey. But when you introduce a layer of smooth, tangy cream cheese filling, the cake transforms into a whole new experience. The filling cuts through the richness of the chocolate while adding a luxurious creaminess that lingers after each bite. It is both comforting and sophisticated, making it an ideal choice for celebrations, family gatherings, or simply when you want to treat yourself to something extraordinary.
The beauty of this cake lies not only in its taste but also in its versatility. Whether you’re baking it for a birthday, an anniversary, or the holidays, it has the power to impress anyone who takes a slice. And the best part is that with the right techniques and guidance, it is not as intimidating as it may seem. By the time you finish reading, you will not only understand why this cake stands out but also feel ready to create it confidently in your own kitchen.
Why This Cake is Truly Decadent
When I describe a cake as decadent, I mean more than just rich in flavor. A truly decadent chocolate cake is one that makes you pause with every bite. It’s the type of cake where each mouthful feels like a small indulgence, a reward that feels worth savoring slowly.
The chocolate layers themselves are baked to be incredibly moist, which is achieved through a careful balance of quality cocoa powder, melted chocolate, and the right amount of fat to lock in that luscious texture. This moisture is what separates a great chocolate cake from a mediocre one. Dry cakes are a baker’s worst enemy, and I’ve learned that the secret to preventing dryness lies in precision—measuring accurately, not overmixing, and paying close attention to baking times.
Now, add to that the cream cheese filling, and you enter the realm of luxury. Cream cheese has a natural tang and smoothness that complements the richness of chocolate beautifully. It softens the intensity of the cocoa without overpowering it. The result is a cake that is indulgent but not overwhelming. Each slice is balanced, offering layers of flavor that work together harmoniously.
What also makes this cake decadent is its presentation. A well-frosted chocolate cake with a surprise filling inside is always impressive. Cutting into the cake and revealing that creamy center is a moment of pure delight for guests. It’s not just dessert—it’s an experience, and one that speaks volumes about the care and thoughtfulness of the person who baked it.
The Secret to the Perfect Cream Cheese Filling
The filling is where magic truly happens in this cake. I often find that the difference between a good cream cheese filling and a perfect one is subtle but crucial. Many people underestimate how much the consistency of the filling impacts the final outcome. If it’s too runny, it can seep into the cake layers and cause them to break apart. If it’s too stiff, it won’t spread evenly or blend into each bite.
To achieve the perfect cream cheese filling, I rely on a few key principles. First, the cream cheese itself must be softened properly before mixing. Cold cream cheese tends to create lumps, which not only affect texture but also prevent the filling from spreading smoothly. I always let my cream cheese sit at room temperature for at least 30 minutes before working with it.
The sweetness level also matters. Too much sugar can overwhelm the natural tang of the cream cheese, while too little leaves the filling tasting bland compared to the rich chocolate cake layers. I prefer using powdered sugar rather than granulated because it dissolves easily, creating a silky filling without any grittiness.
A touch of vanilla extract can elevate the flavor, adding warmth and depth that ties the chocolate and cream cheese together beautifully. Some bakers even fold in a small amount of whipped cream for extra lightness, but I find that keeping the filling simple allows the natural creaminess to shine through.
The goal is a filling that is firm enough to hold its shape when the cake is sliced, yet soft enough to blend seamlessly with every forkful of cake. When done correctly, the cream cheese filling doesn’t just sit between the layers—it becomes part of the overall experience, enhancing the richness of the chocolate while bringing in that irresistible creamy balance.
Ingredients You’ll Need (with Notes & Substitutions)
Every great cake begins with great ingredients. For this decadent chocolate cake with cream cheese filling, choosing quality ingredients is essential because each one plays a role in creating the right texture and flavor. Below is a breakdown of what you’ll need, along with tips and substitutions that can help if you’re missing something or want to adjust for dietary needs.
| Ingredient | Role in Recipe | Possible Substitutions |
|---|---|---|
| All-purpose flour | Structure of the cake | Cake flour for a lighter crumb |
| Cocoa powder | Deep chocolate flavor | Dutch-processed cocoa for richer taste |
| Baking powder & baking soda | Leavening, ensures rise | Must be fresh for best results |
| Salt | Balances sweetness | Sea salt for a more pronounced flavor |
| Sugar | Sweetness and moisture | Coconut sugar for a natural option |
| Eggs | Structure and richness | Flax eggs (vegan) but texture will differ |
| Butter or oil | Moisture and tenderness | Coconut oil or avocado oil |
| Milk or buttermilk | Moist crumb and flavor | Plant-based milk with vinegar for vegan option |
| Cream cheese | Tangy filling | Vegan cream cheese alternative |
| Powdered sugar | Sweetens filling smoothly | Maple sugar (blended finely) |
| Vanilla extract | Flavor depth | Almond extract for a twist |
When I bake this cake, I often use a mix of both oil and butter. The butter adds flavor, while the oil ensures the cake stays moist for days. If I know the cake will be sitting for longer before serving, I lean toward oil to guarantee that moistness doesn’t fade.
I also pay close attention to the cocoa powder. Regular cocoa powder works well, but Dutch-processed cocoa provides a darker color and a smoother, less acidic chocolate flavor. It’s a small detail, but one that elevates the final cake noticeably.
The cream cheese should always be full-fat. Reduced-fat versions don’t give the same luxurious texture, and since this cake is meant to be decadent, there’s no reason to hold back. Using high-quality vanilla extract also makes a big difference in enhancing the overall flavor profile.
Step-by-Step Instructions (Detailed Method)
When it comes to baking a decadent chocolate cake with cream cheese filling, precision is everything. While the ingredient list sets the foundation, it is the method that transforms those ingredients into a masterpiece. Over the years, I’ve learned that small adjustments in technique can make the difference between a good cake and an unforgettable one.
The first step is to prepare your pans properly. Greasing them well and lining the bottoms with parchment paper prevents sticking, which is especially important for a moist chocolate cake. Nothing is more discouraging than putting effort into your batter only to have the cake tear when removing it from the pan.
Mixing the dry ingredients separately before incorporating them into the batter ensures that the leavening agents—baking powder and baking soda—are evenly distributed. This avoids uneven rising and creates a consistent crumb throughout the cake. For the wet ingredients, creaming butter (if you’re using it) with sugar until light and fluffy is essential. This step incorporates air into the batter, contributing to a lighter texture even in a cake that’s meant to be rich and dense.
When combining wet and dry ingredients, I always alternate them, starting and ending with the dry mix. This technique reduces the risk of overmixing, which can lead to a tough cake. At this stage, folding in hot water or coffee can enhance the chocolate flavor while keeping the batter smooth and pourable.
Baking should be done in a preheated oven, and I prefer to bake my layers on the middle rack for even heat distribution. Rotating pans halfway through baking can help avoid uneven rising, especially if your oven has hot spots. Once baked, the cakes should cool completely on a wire rack before assembling—rushing this step can cause the filling to melt into the cake layers, ruining the clean look and texture.
For the cream cheese filling, mixing until smooth is key. I beat softened cream cheese with powdered sugar and vanilla until creamy, ensuring no lumps remain. If desired, chilling the filling for a few minutes helps it firm up and makes spreading easier. To assemble, I layer the cake evenly, applying a generous amount of filling between layers while keeping it slightly away from the edges to prevent spillage when the layers are stacked.
Pro Tips from an Experienced Baker
Every recipe benefits from small secrets that only come from years of trial and error. For this decadent chocolate cake with cream cheese filling, I’ve collected several tips that can guarantee your success.
One of my most important tips is to always use room-temperature ingredients unless otherwise specified. Eggs, butter, and cream cheese blend much more smoothly when they’re not cold, which results in a batter and filling that’s consistent in texture. Cold ingredients tend to create lumps or cause batters to split.
Another trick is to use coffee instead of plain hot water when mixing into the batter. The coffee doesn’t make the cake taste like coffee; instead, it deepens the cocoa flavor and makes the chocolate taste more pronounced. This is a professional baker’s shortcut to a more intense chocolate cake without adding extra cocoa powder.
For an extra moist crumb, I sometimes brush the cake layers with a simple syrup before assembling. This technique is common in professional bakeries and helps the cake stay fresh even if made a day or two in advance. The syrup can be plain, or you can infuse it with vanilla or even a hint of liqueur for added sophistication.
When frosting or decorating the cake, I recommend chilling it briefly after applying the filling. This helps the filling set and keeps the layers stable, making it easier to frost cleanly. If you’re planning elaborate decorations, chilling between each step ensures your design holds its shape.
Finally, always use a serrated knife or cake leveler to trim the tops of your cake layers if they dome during baking. Even layers not only look more professional but also allow the filling to spread evenly, preventing lopsided slices.
How to Get the Perfect Moist Chocolate Cake Texture
The hallmark of a truly decadent chocolate cake is its texture. Dry cake is forgettable, while moist cake stays in your memory. Achieving that perfect texture requires both science and care.
One of the biggest mistakes I see home bakers make is overbaking. Chocolate cake can be deceptive because its dark color hides visual cues that indicate doneness. Instead of relying solely on looks, I always test the cake with a toothpick or gently press the top—it should spring back lightly. Removing the cake from the oven a minute earlier rather than later can make all the difference in preserving moisture.
Another important factor is the fat-to-flour ratio. Using both butter and oil creates a balance of flavor and texture. Butter provides richness and depth of flavor, while oil ensures tenderness. Cakes made with only butter can dry out more quickly, while those made with only oil can lack that signature buttery taste. By combining them, you get the best of both worlds.
The type of liquid you use also impacts moisture. Buttermilk is one of my favorites for chocolate cake because its acidity tenderizes the crumb while adding subtle tanginess. Even if you don’t have buttermilk on hand, adding a teaspoon of vinegar or lemon juice to regular milk creates a quick substitute that works wonderfully.
Lastly, once baked, proper storage preserves moisture. I never leave chocolate cake uncovered at room temperature for long. Instead, I wrap layers tightly in plastic wrap if assembling later or keep the frosted cake in a covered container. This prevents the cake from drying out and allows the flavors to meld beautifully overnight.
Mistakes to Avoid When Baking This Cake
Even experienced bakers can run into trouble with chocolate cakes, and cream cheese filling adds another layer of complexity. Knowing the most common mistakes can save you from disappointment and ensure your cake turns out perfectly every time.
The first mistake is overmixing the batter. Chocolate cake batter should be mixed just until combined. Overmixing develops too much gluten, leading to a dense, chewy texture rather than a tender crumb. It’s tempting to keep stirring, but restraint is key.
Another frequent issue is incorrect oven temperature. An oven that runs too hot can cause the cake to rise quickly and then collapse in the center, while one that’s too cool may leave the cake underbaked and gummy. I always recommend using an oven thermometer rather than trusting the built-in gauge—professional kitchens swear by this because accuracy matters.
With the cream cheese filling, one of the biggest pitfalls is not softening the cream cheese properly. This can result in a lumpy, uneven filling that distracts from the smoothness of the cake. Another mistake is spreading the filling too close to the edges, which often causes it to spill out when the layers are stacked. Keeping a small margin ensures a neater finish.
Finally, impatience can ruin an otherwise perfect cake. Cutting into the cake before it has cooled completely or before the filling has set will create a messy presentation and uneven slices. Allowing the cake to rest after assembly is just as important as baking it correctly—it gives the flavors time to settle and the textures time to come together harmoniously.
Decoration Ideas for a Stunning Finish
A cake as indulgent as a decadent chocolate cake with cream cheese filling deserves to look as good as it tastes. Decoration doesn’t have to be overly complicated, but even a few thoughtful touches can elevate the cake into a showstopper. Over the years, I’ve found that presentation plays almost as big a role as flavor in how people experience a dessert.
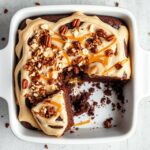
One of my go-to finishes is a smooth chocolate ganache poured over the top. Ganache creates a glossy, luxurious sheen that immediately signals richness. To make it even more eye-catching, I sometimes let it drip gently down the sides, creating a natural, elegant look that feels effortless but still polished.
For a softer finish, chocolate buttercream frosting pairs beautifully with the cream cheese filling. It adds a layer of richness without overshadowing the filling. I often smooth the frosting with a bench scraper for a sleek, modern appearance, or use a star tip to pipe swirls and rosettes for a more classic design.
If you prefer a rustic presentation, dusting the cake with cocoa powder or powdered sugar can be both simple and striking. I’ve also decorated this cake with fresh berries—raspberries or strawberries are especially lovely, as their tartness complements the richness of the cake and filling. A few sprigs of mint or edible flowers can bring a touch of freshness and color, perfect for spring or summer occasions.
Shavings or curls of dark chocolate scattered on top add texture and emphasize the chocolate theme. For special celebrations, I sometimes gild the cake with a sprinkle of edible gold dust. Whatever route you choose, the key is to balance beauty with practicality, ensuring the decoration enhances the cake rather than overpowering it.
Serving Suggestions (Occasions, Pairings, etc.)
A decadent chocolate cake with cream cheese filling is versatile enough to suit many occasions, but how and when you serve it can transform it into something even more memorable.
For birthdays and anniversaries, I often present this cake as the centerpiece of the celebration. Its layered design and hidden cream cheese surprise make it feel festive, even without elaborate decorations. During the holidays, I find this cake pairs beautifully with spiced drinks such as mulled wine, chai tea, or hot cocoa, turning dessert into a cozy seasonal experience.
In terms of pairings, this cake benefits from accompaniments that balance its richness. A scoop of vanilla bean ice cream on the side adds a cold, creamy contrast, while a dollop of whipped cream lightens each bite. If you prefer beverages, coffee and espresso are natural partners. The bitterness of coffee enhances the chocolate flavor while cutting through the sweetness, creating a satisfying balance. For a more indulgent touch, a glass of red wine—particularly something bold like a Cabernet Sauvignon—pairs exceptionally well with the deep cocoa notes.
This cake also works beautifully for more casual occasions. A simple slice served with a glass of cold milk can turn an ordinary afternoon into a small indulgence. Because it’s so versatile, it can be dressed up for elegant dinners or enjoyed in a more laid-back way, making it one of those rare cakes that fits into nearly any situation.
Storage and Make-Ahead Tips
One of the great advantages of this cake is that it not only tastes delicious fresh but also stores well if handled properly. In fact, I often find that the flavors deepen after a day, as the chocolate and cream cheese filling have more time to meld together.
For short-term storage, I recommend covering the cake with a dome or keeping it in an airtight container at room temperature for up to a day. Beyond that, the cream cheese filling requires refrigeration to remain safe and fresh. Wrapped tightly in plastic wrap or stored in a sealed cake carrier, the cake can last in the refrigerator for up to four days without losing its moisture.
If you want to make the cake ahead, the layers can be baked in advance, cooled completely, and wrapped tightly before freezing. They will keep well for up to two months. When you’re ready to assemble, simply thaw the layers at room temperature before adding the cream cheese filling and frosting. This approach can save time when preparing for large gatherings or holidays.
For leftovers, I often wrap individual slices and freeze them. This way, I can enjoy a decadent chocolate cake with cream cheese filling even weeks later—just thaw a slice overnight in the refrigerator and bring it to room temperature before serving. The cake remains moist and flavorful, making it a wonderful treat whenever the craving strikes.
Frequently Asked Questions (FAQs)
Can I use low-fat cream cheese for the filling?
I don’t recommend it. Full-fat cream cheese provides the rich texture and tang needed for the filling to shine. Reduced-fat versions often result in a watery or grainy consistency.
Can I make this cake without eggs?
Yes, but the texture will be different. Flax eggs or applesauce can be used as substitutes, though the crumb may be denser. For the most authentic result, I suggest using real eggs.
What’s the difference between using cocoa powder and melted chocolate in the batter?
Cocoa powder provides depth of flavor and helps keep the texture light, while melted chocolate adds density and richness. This recipe typically benefits from using both, creating layers of chocolate intensity.
Can I add fruit to the cream cheese filling?
Absolutely. Fresh berries folded into the filling create a bright, tart contrast to the richness of the cake. Just be sure to use fruit that isn’t overly juicy, as excess liquid can affect the texture of the filling.
How do I prevent my cake layers from sticking to the pan?
Always grease and line the pans with parchment paper. This simple step ensures the layers release easily and keeps the cake intact for clean assembly.
Variations of This Recipe (Flavors & Twists)
While the classic version of this cake is irresistible, there are plenty of ways to add variety and make it uniquely yours.
One popular variation is to incorporate a swirl of peanut butter into the cream cheese filling. The combination of chocolate, cream cheese, and peanut butter creates a flavor profile that is decadent yet comforting. Another twist is to add a hint of orange zest to the cake batter. Chocolate and orange pair wonderfully, and the zest brightens the richness of the cake without overpowering it.
For a more festive approach, peppermint extract in the filling or frosting transforms this cake into a holiday favorite. Alternatively, adding a splash of liqueur, such as Baileys or Kahlúa, to the filling or frosting can make the cake feel even more luxurious, perfect for adult gatherings.
If you want to lighten the experience, you can create a marbled version by alternating chocolate batter with vanilla batter, then layering it with the cream cheese filling. This creates a striking visual effect when sliced while still retaining that decadent balance of flavors.
Nutritional Information
While this cake is undeniably indulgent, many readers appreciate having an idea of its nutritional content. Keep in mind that values will vary depending on ingredient brands and substitutions. For a standard slice (1/12 of the cake), you can expect an approximate breakdown:
-
Calories: 480–520
-
Fat: 28g
-
Saturated Fat: 16g
-
Carbohydrates: 54g
-
Sugar: 38g
-
Protein: 6g
-
Fiber: 3g
This cake is meant to be an indulgence rather than an everyday treat, but with such balanced flavors, even a small slice feels deeply satisfying.
Why This Recipe Works (Science Behind It)
Understanding why a recipe works can build confidence in your baking. This cake succeeds because it relies on a balance of science and flavor. The leavening agents react with acidic ingredients like buttermilk to create lift, ensuring the cake rises evenly. The combination of butter and oil locks in both flavor and moisture, while cocoa and melted chocolate provide layers of richness.
The cream cheese filling works because of fat and protein. The fat in cream cheese contributes to the smooth texture, while the proteins help the filling hold its shape once chilled. Powdered sugar blends seamlessly without adding graininess, and the vanilla ties the flavors together.
Altogether, this careful balance ensures that the cake delivers not only in taste but also in structure, making it sliceable, beautiful, and delicious every single time.
Conclusion – Final Thoughts on Making a Decadent Chocolate Cake with Cream Cheese Filling
Baking a decadent chocolate cake with cream cheese filling is more than just following steps in a recipe—it’s about creating an experience. Every layer, from the moist chocolate crumb to the velvety cream cheese center, contributes to a cake that feels both luxurious and comforting.
As a baker, I’ve come to appreciate that this cake never fails to impress. It has the visual appeal to command attention at special occasions and the flavor profile to leave lasting memories. What makes it truly special is how accessible it is. With patience, the right ingredients, and a few professional tips, anyone can achieve bakery-level results in their own kitchen.
So the next time you want to treat your loved ones—or yourself—to something extraordinary, this is the cake to make. A slice of this chocolate masterpiece is more than dessert; it’s a reminder that sometimes the best indulgences are those we create with our own hands.

Decadent Chocolate Cake with Cream Cheese Filling
Ingredients
Method
- Preheat oven to 350°F (175°C). Grease and line two 9-inch round cake pans with parchment paper.
- In a large bowl, whisk flour, cocoa powder, baking powder, baking soda, and salt.
- In another bowl, beat butter, oil, and sugar until light and fluffy. Add eggs one at a time, mixing well. Stir in vanilla.
- Add dry ingredients alternately with buttermilk, beginning and ending with dry. Mix just until combined. Stir in hot coffee to thin the batter.
- Beat softened cream cheese, powdered sugar, egg, and vanilla until smooth and creamy.
- Pour half the chocolate batter into each prepared pan.
- Spoon cream cheese filling evenly over the batter in both pans, keeping it about 1 inch away from the edges.
- Bake for 35–40 minutes, or until a toothpick inserted in the center comes out clean. Cool cakes in pans for 10 minutes, then transfer to wire racks to cool completely.
- Frost with ganache or buttercream, decorate with fresh berries, or dust with cocoa powder.
Notes