Over the years, I’ve learned that there’s one dessert idea that never fails to impress at parties — mini dessert cups. They’re charming, portion-controlled, and can be customized to fit any celebration theme. I’ve prepared them for weddings, birthdays, holiday gatherings, and even casual get-togethers, and every single time, they become the talk of the event. Guests love the visual appeal, and hosts appreciate how easy they are to serve.
When I make mini dessert cups for parties, I’m not just creating a treat; I’m creating an experience. The combination of layers, textures, and colors makes each cup feel like its own little masterpiece. Whether it’s a silky chocolate mousse, a tangy lemon cheesecake, or a refreshing fruit parfait, these desserts have a way of stealing the spotlight without taking up too much space on the table.
What I especially love about them is their versatility. You can prepare them ahead of time, adjust the recipes to cater to dietary restrictions, and style them to match the party theme perfectly. That’s why today, I want to share with you everything I’ve learned — from choosing flavors to presenting them in a way that wows your guests.
Why Mini Dessert Cups Are Perfect for Parties
I’ve catered many events where dessert was the biggest challenge. People want something delicious, but they also want it to be easy to eat, mess-free, and photo-worthy. Mini dessert cups check all these boxes effortlessly. They’re individually portioned, which means no awkward slicing or serving at the table, and no one has to worry about someone taking a piece that’s “too big” or “too small.”
Another reason they work so well for parties is their variety. You can prepare several different flavors and styles in one batch, which gives your guests the joy of choice. Some people might go for rich, chocolatey layers, while others prefer fruity and refreshing options. By offering multiple varieties in one dessert table, you create an interactive experience where people can mix and match according to their preferences.
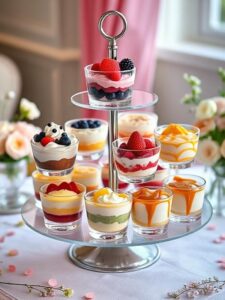
There’s also the fact that they’re incredibly easy to display. Mini dessert cups fit beautifully on tiered stands, trays, or even rustic wooden boards. They take up less space than a large cake but still make a big impact visually. And if your party is outdoors or in a warm setting, smaller portions mean desserts are eaten faster, reducing the risk of melting or spoilage.
Types of Mini Dessert Cups You Can Make
When it comes to mini dessert cups, the possibilities are endless. I’ve experimented with so many variations over the years that I’ve lost count, but a few have become my go-to choices for parties.
One of my favorites is the layered cheesecake cup — a mix of crushed biscuits, creamy cheesecake filling, and fruit toppings. It’s always a crowd-pleaser and easy to prepare ahead of time. Then there’s the chocolate mousse cup, which is perfect for chocolate lovers and can be topped with whipped cream, berries, or even edible gold flakes for a luxurious touch.
For lighter and more refreshing options, I love making fruit parfait cups with layers of yogurt, granola, and fresh fruit. They’re perfect for summer parties or brunch events. And if you want something seasonal, pumpkin pie cups in the fall or peppermint mousse cups during the holidays are fantastic themed options.
If you’re feeling creative, try mixing textures — for example, a brownie base topped with vanilla cream and finished with a crunchy caramel layer. Or experiment with flavors from around the world, such as matcha mousse, tiramisu cups, or mango sticky rice cups. The beauty of mini dessert cups is that you can adapt them to your taste, your guests’ preferences, and the theme of your party.
Essential Ingredients and Tools You’ll Need
Over time, I’ve found that the secret to making perfect mini dessert cups lies in using the right ingredients and tools. You don’t need a professional kitchen to make them, but having a few essentials on hand makes the process much smoother and the results more consistent.
For ingredients, I always start with a base — this could be crushed cookies, cake crumbs, brownie pieces, or even granola for lighter options. A good base adds texture and helps hold the dessert together. Then comes the filling — creamy options like mousse, cheesecake, custard, or pudding are always winners. And, of course, the toppings — fresh fruit, whipped cream, chocolate shavings, caramel drizzle, or sprinkles can turn a simple dessert into something extraordinary.
As for tools, mini dessert cups themselves are the star. I like using clear plastic or glass cups so the layers are visible — presentation is half the magic. You’ll also want piping bags for clean, precise layers, small spoons or spatulas for scooping, and a few mixing bowls for preparing different components at once. If you plan on making multiple flavors, small storage containers help keep ingredients fresh until assembly.
I’ve learned that investing in these basics saves a lot of time and frustration. It also makes the process more enjoyable, which is just as important as the final result.
Step-by-Step Guide to Making Mini Dessert Cups
When I make mini dessert cups for a party, I always follow a simple structure that keeps things organized and ensures each cup looks and tastes perfect. The process is straightforward, but the key is attention to detail at every stage.
First, I prepare all the components in advance. If I’m making cheesecake cups, I crush the cookies for the base, whip the cream cheese mixture, and get the fruit ready. Having everything set out before assembly makes it feel more like an art project than a chore.
Next comes layering. I start with the base, making sure it’s evenly distributed in each cup. Then I pipe or spoon in the filling, being careful not to smear the sides of the cup. Clean layers make the final presentation look much more professional. After that, I add toppings — but I save delicate items like whipped cream or fresh fruit for just before serving to keep them fresh.
Finally, I chill the cups for at least an hour before the party. This helps the flavors blend together and gives the dessert the perfect texture.
I’ve discovered that this method works for almost any type of mini dessert cup, whether you’re making something indulgent like tiramisu or refreshing like lemon mousse. Once you master the basics, you can get creative without worrying about the structure falling apart.
Creative Flavors and Combinations to Try
If there’s one thing I’ve learned from years of party catering, it’s that flavor variety keeps guests excited. I always recommend offering at least two or three different mini dessert cup flavors at any event. This way, guests can enjoy a little tasting experience instead of sticking to just one option.
For chocolate lovers, I often make triple chocolate cups — a base of chocolate cake crumbs, a layer of milk chocolate mousse, a layer of dark chocolate ganache, and a topping of white chocolate curls. It’s rich, decadent, and always a hit.
For something lighter, strawberry shortcake cups are a favorite. Layers of vanilla sponge, whipped cream, and fresh strawberries create a refreshing balance. If I’m feeling adventurous, I make tropical fruit cups with mango mousse, pineapple chunks, and a coconut cream topping.
One of my more unique creations is a caramel apple cheesecake cup, which has a graham cracker base, spiced apple compote, creamy cheesecake filling, and a caramel drizzle. It’s especially popular at autumn events.
To make the choices easier for party planning, I often use a table to list some popular combinations for inspiration:
| Dessert Cup Flavor | Base | Filling | Topping |
|---|---|---|---|
| Triple Chocolate | Chocolate cake crumbs | Milk chocolate mousse | White chocolate curls |
| Strawberry Shortcake | Vanilla sponge | Whipped cream | Fresh strawberries |
| Tropical Fruit | Crushed biscuits | Mango mousse | Coconut cream |
| Caramel Apple Cheesecake | Graham cracker crumbs | Cheesecake filling | Caramel drizzle |
| Lemon Blueberry | Shortbread crumbs | Lemon curd | Blueberries & powdered sugar |
Tips for Presentation and Serving
I’ve always believed that the first bite of any dessert is taken with the eyes. That’s why presentation is just as important as flavor when it comes to mini dessert cups. Since these treats are naturally photogenic, a few thoughtful touches can elevate them from simple sweets to show-stopping centerpieces.
I love using clear glass or high-quality plastic cups because they allow the beautiful layers to shine through. If your party has a specific theme or color scheme, you can add matching ribbons, mini tags, or edible glitter to tie the desserts into the overall design.
When it comes to serving, I recommend arranging them on tiered stands or dessert trays. This adds height and dimension to the table, making it more visually appealing. For outdoor events, I sometimes serve them in covered cups or with mini lids to keep them fresh and protected.
Small spoons placed beside each cup also make the experience feel more personal and organized. And if you’re hosting a more formal gathering, consider setting a mini dessert cup at each place setting — it doubles as a dessert and a table decoration.
Make-Ahead and Storage Tips
One of the best things about mini dessert cups is how easy they are to prepare in advance. In fact, making them ahead of time can actually improve the flavor as the layers have time to blend together.
For creamy desserts like cheesecake or mousse cups, I prepare them the day before and store them in the refrigerator. I keep any fresh fruit toppings separate until just before serving to ensure they stay vibrant and juicy. Whipped cream should also be added at the last minute to keep it fluffy.
If you’re making dessert cups with cake or cookie bases, those can be prepared several days in advance and stored in airtight containers. This way, assembly is quicker and less stressful on the day of the party.
Most mini dessert cups will keep well in the fridge for 2–3 days, but I’ve found that serving them within 24 hours gives the best texture and freshness. If you’re making large batches, label your storage containers so you can assemble and serve them in the right order.
Mistakes to Avoid When Making Mini Dessert Cups
Even with a dessert as versatile as this, there are a few pitfalls that can ruin the final result. I’ve made my fair share of mistakes over the years, so I always share these tips with anyone trying them for the first time.
The first mistake is overfilling the cups. It might be tempting to pack in as much dessert as possible, but too many layers can cause spills and make the presentation look messy. Leave a little space at the top for toppings and easier serving.
Another common error is using wet or watery ingredients without draining them first. Fruits like pineapple or berries can release moisture over time, which may seep into other layers and affect the texture. I always pat fruit dry or drain it well before adding it to dessert cups.
Lastly, avoid rushing the chilling process. Skipping refrigeration time can cause the dessert to be too soft, making it difficult to enjoy neatly. Patience is key — a well-chilled dessert cup holds its shape and tastes better.
Dietary Variations (Gluten-Free, Vegan, Sugar-Free Options)
As someone who often caters to diverse crowds, I’ve learned that offering dietary-friendly options is essential for a truly inclusive party. Mini dessert cups are perfect for this because they can be easily adapted to fit various needs.
For gluten-free guests, I swap regular cookies or cake crumbs for gluten-free alternatives, such as almond flour crusts or certified gluten-free biscuits. For vegan options, I use coconut cream or plant-based whipped cream, and replace dairy-based fillings with cashew cream, tofu-based mousses, or almond milk puddings.
If I’m making sugar-free versions, I opt for natural sweeteners like stevia, monk fruit, or erythritol. Fresh fruit can also add natural sweetness without the need for extra sugar.
Having these variations available not only ensures all your guests can enjoy dessert, but it also shows thoughtfulness — something people always remember long after the party ends.
How to Match Mini Dessert Cups with Your Party Theme
Matching desserts to a party theme is one of my favorite creative challenges. Whether it’s a wedding, baby shower, or holiday celebration, there’s always a way to make mini dessert cups fit right in.
For weddings, I love using elegant flavors like champagne mousse or lavender panna cotta, topped with edible flowers. At baby showers, pastel-colored mousse cups with themed toppers are adorable and perfectly on-brand.
Seasonal parties open up even more possibilities — pumpkin spice cups in autumn, peppermint bark mousse in winter, or tropical fruit cups for a summer luau. Even the cups themselves can be chosen to match the event, from rustic mason jars to sleek, modern shot glasses.
Small decorative touches like themed sprinkles, custom labels, or color-coordinated ribbons can pull the whole look together. It’s these small details that make desserts feel intentional rather than generic.
Cost and Budget-Friendly Options
You don’t have to spend a fortune to create beautiful mini dessert cups for parties. In fact, some of my most successful dessert tables were made with budget-friendly ingredients and smart planning.
Buying ingredients in bulk is one of the easiest ways to save money. I often get cookie crumbs, chocolate, and cream in larger quantities, which lowers the cost per cup. Making fillings from scratch instead of using pre-made mixes also saves money and gives you more control over the flavor.
For presentation, reusable cups or budget-friendly clear plastic ones work beautifully. You can still make them look luxurious with creative toppings and neat layering.
The truth is, mini dessert cups are about creativity, not cost. With a little planning, you can impress guests without overspending.
FAQs About Mini Dessert Cups for Parties
How far in advance can I make mini dessert cups?
Most can be made 1–2 days ahead, but add toppings like whipped cream and fruit just before serving.
What size cup works best?
I usually use 2–4 oz cups — small enough for guests to enjoy without feeling too full, but big enough for layered flavors.
Can I freeze mini dessert cups?
Some, like mousse or cheesecake, freeze well, but be mindful that fresh fruit toppings may not hold their texture after thawing.
How many should I make for a party?
Plan for at least two cups per guest — people often want to try more than one flavor.
Conclusion and Final Serving Inspiration
Mini dessert cups aren’t just a treat — they’re a party highlight. Over the years, I’ve seen guests’ eyes light up as they choose their favorites from the dessert table. These small, elegant cups offer variety, convenience, and beauty all in one bite-sized package.
Whether you keep it classic with chocolate mousse or surprise guests with unique flavor combinations, mini dessert cups give you the freedom to be creative while still keeping things practical. And the best part? You can prepare them in advance, serve them with style, and enjoy the celebration without stress.
If there’s one thing I hope you take away from my experience, it’s that the magic of mini dessert cups lies in their versatility. Once you master the basics, the possibilities are endless — and your guests will keep coming back for more.